SmartSplice Tutorial 1: Getting Started

Objective: Get accustomed to the extraction and insertion process.
Welcome to the first tutorial for SmartSplice (version 2). In this tutorial, we will extract a statue from an image and insert the statue on top of a novel background image.

Step 1: Run the program.
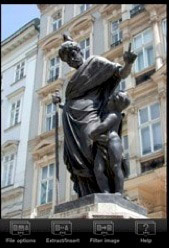
Tap on the SmartSplice icon to run SmartSplice. The opening screen will appear as shown on the right.
A main menu (consisting of 4 buttons) shows up at the bottom of the screen. A zoom-in of these buttons is shown below:

The “File options” menu presents options for loading, capturing, saving, and sharing images. Camera capture is only available if your device has a built-in camera.
The “Extract/Insert” menu presents options for extracting objects from images, inserting objects into images, and viewing the current clipboard.
The “Filter” menu presents a list of image filters for applying special effects.
The “Help” button presents a menu of help options to give instructions on how to use each of the various tools and filters. This web tutorial aims to give a more pictorial walkthrough of the extraction and creation processes.

Step 2: Load a working image.
Click on the “File options” button at the bottom left corner of the screen, and then click on “Load/Acquire” in the subsequent menu that appears. This will prompt a new menu of buttons to appear.
Press the “From file” button to load an existing image from the device’s Photo Album. This will present the usual image picker interface. If you have Buddy Groups (version 2.0 or later) installed, you may pick an image from your organized galleries. Choose an image with an object you want to extract.
In this tutorial, we’ll choose a photo of a statue. The selected image is copied into the active image workspace. We’ll refer to this image as the working image because it is the image we are working on and the one that will be saved if we press the “Save image” button. The working image is shown below:
Note that you can easily move the image by dragging it around with a single finger. You can also zoom in and out by using the usual pinching motions (move two fingers toward each other to zoom in, move two fingers apart to zoom out). These intuitive motions control how you view the working image. They do not crop the image or change its resolution.
Step 3: Navigate to the Extraction tool.
We now seek to extract the statue. Press the “Extract/Insert” button in the main menu. This will bring up a new menu of edit options.

SmartSplice possesses two methods of extracting clippings: box extract and smart extract. Click on “Smart extract” for the purposes of this tutorial. Box extract is useful for quickly copying rectangular portions of the working image into the clipboard. Smart extract deftly handles arbitrary object boundaries that may even posses varying amounts of translucency.

This menu has 3 options. “Extract clipping” is used to extract an object from the working image. The extracted object will be copied to the clipboard. We will refer to such an image as a clipping. “Insert object” is used to insert an object (clipping from the clipboard, text, other pre-made object) into the working image. “View clipboard” allows you to view, save, load, and edit a current clipping.
Press the “Extract clipping” button. This will present a new menu for handling extraction.
Step 4: Specify a coarse boundary.
The menu for the extract tool is shown below.

The “Move/zoom pic” button defaults to a selected state. This means that you can use the drag and pinch interface for moving and zooming the image.
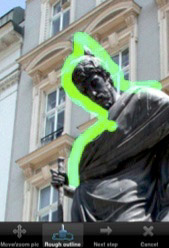
You’ll soon be using your finger to paint a coarse outline around the object you want to extract. The outline can be coarse, but must cover the actual boundary of the object you’re trying to extract. With that in mind, zoom in and drag the image so that you can clearly see (at least part of) the boundary of the object.
Then press the “Rough outline” tool. At this point, dragging your finger on the image will leave a green paint; it will not drag the working image around. Paint over the boundary of the object, making sure that any partial transparency (such as strands of fur on the boundary) are covered in green paint.
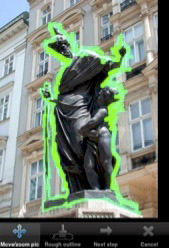
Not all of the boundary may be painted over at this point, so click on the “Move/zoom pic” button so that it is active. Now drag the image (and zoom if necessary) to see more of the image. Click on the “Rough outline” button again and continue painting over the boundary. Repeat until the entire boundary is covered. You should be left with an image like the one below:
In this example, the object we wish to extract is just a single statue. But if there are other parts of the image we wish to extract and associate with this object--say, a particular window--we can paint a green outline around the desired window too.
Shaking the device will erase all the green paint.
Step 5: Fill in the foreground.
Press the “Next step” button to proceed onto the next step of the extraction tool. The following menu appears:

The menu again defaults to having the “Move/zoom pic” button as active. Press the “Foreground” button to make it active (as shown above). Notice that the button’s icon is a paint bucket. When this button is active and you tap a spot on the image, a red “foreground label” will propagate through the region, stopping only when it touches the green outline paint or hits the edge of the image.
In the image below, we tapped the screen once inside the interior of our green boundary. Tap on all the regions of the image that are part of object you wish to extract, but not already covered in green paint.
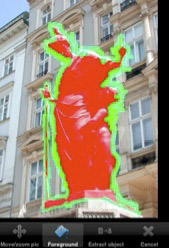
Now you should have an image like the one above: the object you wish to extract is surrounded by a green paint that covers its actual boundary; and the interior is labeled in red.
Step 6: Extract the object!
Press the “Extract object” button! A progress bar will pop up on screen to tell you how the extraction process is progressing. The exact speed of this processing will depend on the resolution of the image you’re processing, the size of the object you wish to extract, and the complexity of the boundary. On large images, this process might take about a minute.
When the processing is finished, SmartSplice will present you with a view of the clipboard, where you can see the extracted object.
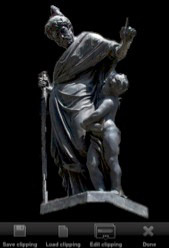
The clipboard menu is shown below. Press “Save clipping” to save the clipping to your Photo Album. In later runs of the program, you can then load and use the clipping. You can also share your saved clippings with others.

Step 7: Refine extraction if desired.
If the computed extraction includes portions of the image you did not want to be included, press “Edit clipping” to bring up the following menu:

With the “Move image” button active, zoom in to see the portion of the extraction that you want to erase. Click “Erase” to make it active. Then use your finger to erase the undesired portion of the extraction. If you erase too much, click on the “Restore” button and use your finger to undo any erasures you want (“Restore” acts like an undo brush). Press “Done” when you’re done with the refinements. Press “Save clipping” to save your changes (as a new clipping).
Step 8: Load a novel background and navigate to the insertion tool.
From the view of the clipboard, press “Done”. This will return you to the extraction and insertion menu. Press “Cancel” to return to the main menu. From the main menu, load a new background image from file. This background image will become the active working image. (Press “File options”, “Load/acquire”, “From file”, select desired background image). Here, we chose a group of trees as our background.
Now navigate to the insertion tool: Press “Extract/Insert”, press “Insert object”, press “Insert clipping”.
Step 9: Insert the clipping into the working image.
A copy of the current clipping (the image that appears in the clipboard view) will now appear on top of the background image. A new menu will also appear, allowing you to move the foreground (clipping), move the background (the working image), insert the clipping, and cancel the insertion procedure.

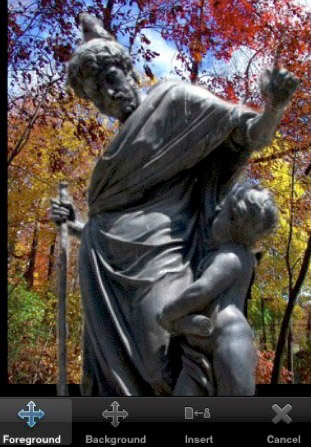
With the “Foreground” button active, use the usual drag and pinch interface to move and zoom the clipping into any desired position and relative size. To adjust the background image, click on the “Background” button to make it active and use the same drag and pinch interface to move and zoom the background image.
When choosing what level of zoom to use to view the images, choose whatever level is comfortable and helps you position and size the clipping properly. Only the relative sizes of the background working image and foreground clipping matter. In other words, zooming in so that both the background image and clipping are twice as large does not change the size of the saved working image; it only changes your view of the images.
If the foreground clipping extends beyond the edge of the background, after insertion it will be clipped to the background image’s edge.
Press the “Insert” button when you’re done positioning and sizing the clipping in relation to the background image. The resulting working image (with the insertion) will be the same size as the background image that was used.
Step 10: Save and share the image!
Press the “File options” button and then “Save image” to save the working image to your Photo Album. You can now share the image with your friends.
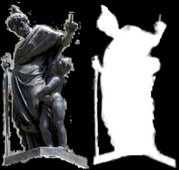
You can also share the clipping you saved. In your Photo Album, it will appear as an image with two halves: the left half has some color information and the right half has a mostly black and white mask.
This perhaps peculiar image format is used to bypass a limitation in the current Apple software system. If you have Buddy Groups installed and save the clipping to an image gallery, this limitation is bypassed since Buddy Groups supports images with transparency information. To load these clippings into SmartSplice’s clipboard for use in future image editing projects, press “Extract/Insert”, press “View clipboard”, press “Load clipping”, and choose the desired clipping.
Go ahead and create your own image splices now!