
BuddyGroups Tutorial 1: Emailing Groups
OBJECTIVE: Learn advanced email options
Email Overview:
Buddy Groups provides you with a number of useful options when emailing a group. To email a group, you can either:
-
A)Tap on the “Email” button from the start screen. Then select the group you would like to email.
-
B)Select a group from the start screen. Then tap on the “Email” button in the bottom-left corner of the screen.
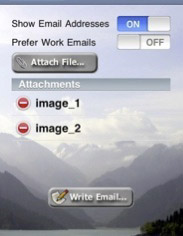
You should now see a screen like this:
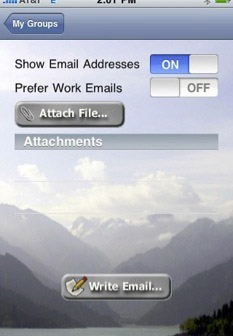
Distribution List Options:
Buddy Groups provides two on/off switches for customizing your distribution list. The first option (“Show Email Addresses”) will allow you to choose between displaying everyone’s email address in the “To:” field (when “ON”), or hiding the distribution list in the “BCC:” field of your email (when “OFF”).
The second option (“Prefer Work Emails”) lets you select whether you prefer to email people’s work or personal email address. When “ON,” Buddy Groups will prioritize emailing an individual’s work email address if it is present. If there is no work email, it will fall back to personal email. When “OFF,” Buddy Groups will prioritize personal email addresses.
Email Attachments:
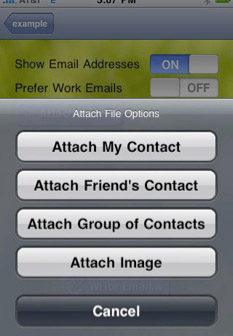
Buddy Groups also supports a variety of email attachments. By tapping on the “Attach File...” button, the following options will appear:
Attach My Contact:
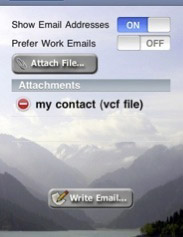
By selecting this option, Buddy Groups will attach your contact information to the email via the industry-standard (vcf) business card format. Note: iPhones and iPods can recognize this format and easily add the contact information to their address books.
Attach Friend’s Contact:
This option lets you select a friend from your address book. The selected friend’s contact information will be converted to an industry-standard (vcf) business card and attached to your email.
Note: The Buddy Groups Lite limits the number of friend’s contacts to two. The full version of Buddy Groups allows as many as the device will support (limited by memory and system resources).
Attach Group of Contacts:
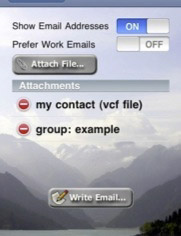
This option lets you select a contact group. Business cards are created for each group member and attached to your email.
Note: This feature is not available in the “Lite” version of Buddy Groups. Non-Lite Buddy Groups is required.
Attach Image:
This option lets you select an image to attach to the email. For more information on organizing and selecting images, see the Buddy Groups Gallery tutorial.
Note: Buddy Groups Lite has a limit of one image attachments. The full version of Buddy Groups will allow as many image attachments as supported by the device (limited by memory and system resources).
Missing Emails:
When emailing a contact group, Buddy Groups will automatically notify the user if there are any contacts missing email addresses. If there are missing emails, you will have the option of continuing (if there is at least one contact with an email address), filling in the missing emails before continuing, or canceling the email.
If you choose to fill in the missing emails, you will be brought to the “Missing Emails” page:
In this example, the contact “Sandstorm Jr Bold” does not have an email address specified in the address book. Tap on the contact entry to enter an email address:
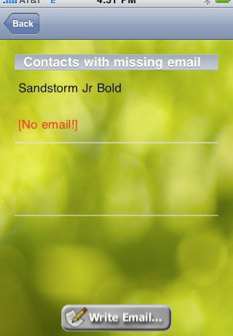
Tap on the text field (where it says “enter email here”) to bring up a keyboard. Once you have entered an email address (press “Done” on the keyboard and “OK” on the edit email box), you will see the new email address in the contact list.
When you are ready, tap on “Write Email...” to continue writing your email. If you want to cancel the process, simply click on the “Back” button in the top left corner of the screen.
Congratulations! You have completed the first tutorial of Buddy Groups.
