
BuddyGroups Tutorial 2: Image Galleries
OBJECTIVE: Learn how to manage collections of Photos and images
Step 1: Create a Gallery
Buddy Groups makes it easy to create Galleries: collections of photos and/or images. This is especially useful when you have many photos or want to share a subset of your photo collection with friends. Buddy Groups also allows you to save captions for each of your photos and share those comments with friends.
Let’s begin! First, tap on the “Galleries” menu button at the bottom of the start screen. You should see something like this:

Note: You may have different galleries in your list, depending on whether you have created any galleries previously. A sample gallery will be created the first time you use Buddy Groups.
The “[device] photo albums” are the default albums built into the device itself (e.g., the camera roll on the iPhone). Unlike the galleries in Buddy Groups, these albums do not support captioning. Images within them also cannot be deleted or re-arranged.
Tap on the “Create New Gallery...” button near the bottom of the screen. A text field will appear, allowing you to name your new gallery.
In this tutorial, we will name our new gallery “Random”
Press “OK” when done.

After tapping “OK,” you should be returned to the Gallery screen, and you should see your new gallery in the list. In this example, you can see the new gallery, “Random.”

Step 2: Adding Images To Your Gallery
To add images to your gallery, first select your gallery by tapping on the name. You will be brought to a new screen that lists all images in the selected gallery. In our case, “Random” does not currently have any photos, so you should see an empty gallery (shown below).

Tap on the “Add Image To Gallery...” button to select an image to add to our current gallery, “Random.” A image selection screen will appear. First, select the gallery which contains the desired image. Then select the image you wish to add to our current/new gallery.
Note: “[device] photo albums” brings up the standard iPhone/iPod photo album selection screen.
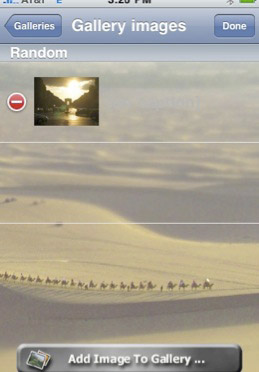
Once you have selected an image, you will now see that image appear in the list of images associated with your current gallery:

Step 3: Adding A Caption
To completely customize our gallery, let’s now add a caption. Tap on the “Edit” button in the upper right corner of the screen. This will put your gallery in Edit Mode.

Now tap on the photo for which you wish to add or edit a caption. A text field will pop up, allowing you to enter your new caption. Simply tap on the text field where it says “enter new caption here” to bring up the keypad.
After entering your caption, hit “Done” and “OK” to return to the gallery view. You should see your new caption next to the photo you selected. You can now either press “Done” in the upper right corner to return to View Mode, or tap on “Galleries” to return to the list of galleries.


That’s all there is to it! You are now ready to organize your photos and trade galleries!
Before we finish our Gallery tutorial, let’s delve into two power-user features that could be useful: copying images and editing photos.